Solar Eclipse Photography and Sound
Photographing an Eclipse is really four completely separate
things;
Photographing the Event - the people with you and their
activities.
Photographing the Sun before and after totality
Photographing the Corona during totality.
Watching, and Listening for the 'ole memory banks
The Big One! July 11 1991,
almost
six minutes of totality
click to enlarge
|
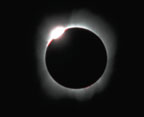
The Diamond Ring
1/250 second, F5.6, asa 100
400 mm lens, cropped by about 75% here
|
click to enlarge
|
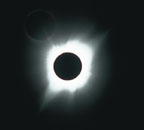
The Full Corona
1/15 second, F5.6, ASA 100
400 mm lens, cropped by about 50% here
|
Recording the EVENT.
In the long term view, this is the most satisfying task.
The photos you take of the people, activities and general festival-like
atmosphere are the ones you will remember and share. Your
pictures of the sun and
corona, they will look just like everyone else's, and they will be
technically
inferior to shots taken with amazing equipment that you can't
afford.
The pictures you take of the event as you experience it are
uniquely
yours, and do not depend on expensive equipment.

Sunworshiper |

Me & Irene |

Equipment Check |
Likewise, the sounds of the eclipse (before, during and after) are an
integral part of your memory of the event. Recording sound was
frequently
suggested at eclipse warm-up talks, but I don't know anyone else who
has actually done it. For my fifth total eclipse, I finally
followed
through. I watched and listened to the eclipse of March 29, 2006
in Salloum Egypt, and recorded sound continuously for 4 1/2 hours as I
wandered around the viewing site and the event unfolded. The
recording device was an MP3 player/recorder made by IRiver. It's
about the size of a pack of gum, and has many hours of recording
capacity. I just hung it around my neck while I wandered. That
recording (edited
down to 50 minutes, 12mb) paired with this
gallery of images
is a unique memory refresher for the event.
Photographing the SUN.
...During the partial phases before and after totality. don't
try it without special filters, specifically designed for that purpose.
Otherwise, you will ruin your camera and/or your vision. Suitable
filters can be found at reasonable prices in popular Astronomy
magazines, such as Sky and Telescope. I use the "Solar Skreen" from Tuthill. The only really good
reason to have a direct viewing filter for your camera is to allow you
to aim your tripod-mounted camera before totality begins. You can get
almost as accurately set up by using the shadow of your camera as a
guide.
However, unless you're a complete die hard, don't bother. Photos of
the
sun before totality are considerably less interesting that photos of
the
moon. The best you'll get are a few sunspots.
Instead, I recommmend indirect photos, which can include interesting
background
and human subjects. For example, you can photograph the image of the
cresent
sun being projected onto a piece of cardboard through a pinhole. You
will
probably be with a lot of other excited people, with lots of fancier
equipment
than you. Use them as your subjects. My best before eclipse
photos
are of a crowd of people surrounding a large telescope, projecting the
solar
image onto an 8x10 ground glass.

Partial phase with Solar Skreen |

Partial Eclipse projected by a hat |

Partial Eclipse projected by a small telescope |
Photographing the Corona
In general, no special equipment or preparations are needed. Starting
from the "Entry Diamond Ring" phase (as the last rays of direct sun
disappear) until the "Exit Diamond Ring" phase, you can observe the
eclipse directly with your eyes and camera.
- Flash
-
- If your camera has an onboard flash, make sure it's off!
off! off!. You'll make no friends by popping a flash in the eyes of
companions who are
trying to view the eclipse.
- Focus
-
- Turn off autofocus and focus at infinity. If you can, lock the
focus.
If you can't, tape your focus ring so it won't be moved accidentally.
- F-Stop
-
- Since you'll be using a long, and therefore slow lense, use your
maximum (largest) f-stop, which will probably be in the f5.6 to f11
range.
- Shutter
-
- All sutter speeds will produce interesting results, ranging from
1/500 all the way up to multiple seconds. The longer the time, the more
corona. The shorter times show solar prominences. No single exposure
will ever look
like it does to your eye. This isn't bracketing to find the "right"
shutter
speed: you will really get very different, interesting photos at each
shutter
speed.
-
- Overall planning
- I recommend you have your equipment generally ready, but
with
your lens capped, before totality. *WATCH* the entry diamond ring, then
the eclipse itself for at least half the expected time. Then start with
longer exposures and work your way down to the vicinity of 1/500 f8 asa
100 for the
closing diamond ring. IMMEDIATELY after the closing ring, cover your
lenses
and avert your eyes.
- Lense
- Use Long Lenses (400-800mm) if you're attempting a sun only
shot. The sun is small, 1/2 degree, so unless you use long lenses, your
frame won't be satisfactorally filled. If your lense is too long, and
you make long
exposures for maximum corona, you won't be able to capture the full
solar
corona in the frame.
If the sun will be near enough the horizon, there are also
interesting possibilities in capturing the sun with other objects
visible. The overall lighting during totality is similar to at dusk,
with a 360 degree sunset visible
all the way around the horizon.
- Film
-
- Use slow film (ASA 100 or less). An eclipse is almost
completely a B&W event, and if you're interested only in "deep
corona" shots, B&W
film might be the right choice. But there are enough exceptions that I
recommend
color film. The only source of color close to the sun is solar
prominences,
which are red.
I recommend slide film, even if you intend making prints. Non-custom
prints
are likely to be pretty disappointing.
Film? What Film? (Shooting Digital)
At my most recent Eclipse,
everyone was shooting
digital. A few die-hards had film cameras too. In general,
the instructions for film still apply, except you don't have to worry
about the lab cutting up your film. Two points though:
- Manual control of the exposure and focus is absolutely
essential. Your digital's autofocus and autoexposure will
disappoint you.
- Digital photography is not as good as film at capturing the
corona, but is a lot easier to manipulate after the fact. The
good news is that ordinary viewing environments (prints, onscreen) are
not as good as slide film either, so you won't notice.
You won't have time. Shoot only as
much film as you have bodies
for.
You won't have enough time to reload. You probably won't even have time
to change bodies on your lense. See
PracticeA right-angle viewing attachment is
very handy - dealing with
the
dazzle factor of the sun, before totality, is very hard. You don't need
a
full fledged right angle viewer; a spare prism you can hold in front of
your regular eyepiece is fine. You MUST use proper filters before
totality, right
angle viewer or not.
Automatic bracketing is a great time saver, if your camera has
the
capability. My Minolta Maxxum has a "bracketing card" that can be
set
to shoot 7 frames at 1 stop increments. With this card activated,
I
can shoot a full range of eclipse exposures while changing the camera
settings
only once.
Paranoia
Don't go to K-mart or 1-Hour photo.
Shoot a normal frame at the
beginning of each roll, to help the negative-cutter line up. Have the
camera store mark
the film for special attention. If you're really paranoid, have them
develop
only, no slicing and mounting.
Practice
Practice shooting eclipse sequences by shooting the full moon.
Use
a timer. Waste a few rolls of film getting it right. Or practice
without
film. The eclipse will be
TOO SHORT and will not wait for
you.
It's particularly important to practice aiming and framing the photos.
The
edges of the frame will be black, so you won't be able to see where
they
are. Instead, you have to practice panning a little each way,
until
the image starts to clip against the edges of the field, then pan back
halfway
to put the bright stuff in the approximate center.
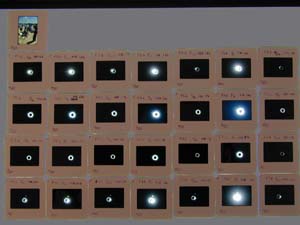
- An Example
| Here the full sequence I shot during the Aug 11, 1999
eclipse, in Turkey, using ASA 100 Fujichrome, A 400MM Lens, Minolta
Maxxum and a bracketing card.
The bracketing card was set to shoot a sequence of 7 exposures +- 3
stops
from the initial exposure. The first frame is a "normal" frame to
help
the film cutter with framing. The first row and last row capture
the
leading and trailing "diamond ring" effect.. The middle two rows
capture
the early-middle and late-middle of the eclipse. I had to adjust
exposures,
check framing, and press the shutter only 3 times during the
eclipse.
Without the bracketing card, there is no way I could have shot
so
many frames during this brief eclipse. (Or for that matter, would have
wanted
to even if possible. Watching is the main event.).
For
the truely serious, try the Umbraphile;
a build-it-yourself interface for your Macintosh to control your camera. |
 click to enlarge
|
-
Finally, STOP AND LOOK
Don't forget to stop and look. I had almost 6 minutes, and it wasn't
long, believe me. Most eclipses are much shorter. It will be a tradgedy
if you end
up with some great shots, but all you can remember is frantically
manipulating your camera.
Since photographing this Eclipse in 1991, I've made it a point to
schedule vacations around the possibility of viewing another solar
eclipse. I've
been lucky so far: in India in 1996, in the Carribbean in 1998,
and
in Turkey Aug 11, 1999. Next stop TBA.
comments/suggestions to: ddyer@real-me.net
My
photo
page


